Saturday, May 4, 2013

Soccer Refereeing Tips #4

-Substitutions-

It's almost time to play, and the book for official referees is massive, how much do you know.  Well, here are some key rules to keep an eye on to keep the game fair.

Players:  Each team may have up to 11 members, no game will be played if a team is down to 7 players.
Substitutions:  In official FIFA matches, there will be no more than 3 substitutes during gameplay.  National "A" matches may have up to 6.  Other competitions may have more, and will be decided by the league.

How to Substitue:
-Referee must be informed prior to it occurring
-Substitute may only enter once the substituted player has left the field
-Substitute may only enter at the half-point of the field and during an official game play pause
-The substituted player may not participate anymore in the match
-Any player may substitute for the goalie
Sanctions:  If a team does not follow procedure, it is up to you (the Ref) to act appropriately.
If switch occurs without Refs knowledge-stop play, cautions the sub for unsportsmanlike behavior, and orders him to leave the field
If a substitute starts in the match rather than a starting player without the Refs knowledge-play continues, no sanctions, number of substitutes is not reduced, action is reported to appropriate officials
If substitute occurs with the Goalie is not told to the Ref-Play continues, on official break the Ref cautions the substitute

In all cases, the substitute is cautioned and the ball is given to the opposing team.

This gives a quick glance at a major area that Referees will deal with, tomorrow we will look at the powers and duties of the Referee

Play on!

Friday, May 3, 2013

Soccer Refereeing Tips #3

-Field and Gear-

Everyone see's the field, and everyone has an idea about the gear, but do you know what the lines mean and what gear you really need?

Field:  Here's a basic layout of the common soccer field.  The dimensions of a field vary between 100x50 to 130x100 yards.  Head out to a field and see if you can identify the main areas of the field.

Gear:  The main item you will need will be the game ball, or 3 or 5.  They should not give way when squeezed.  Be sure to check each playing ball to ensure it is properly filled.  If you have extra, place one at the side of each goal box, that way the goalie can grab one quickly.  There are different sizes, based on age group, and gender.


Now get out there are start doing warm-up laps, tomorrow we'll actually get into the nitty-gritty.

Play on!

Thursday, May 2, 2013

Soccer Refereeing Tips #2

-Hand Signals-

Long before you hit the field for your first game you are going to want to know the hand signals involved during game play.


From the image above, you see that there is a fair mix of using your hands, a whistle, and flags.

When making a movement, be sure you know which team is on which side, as the direction you "point" is against the side who it is for.

Practice making these motions and read up on when to do them.  Tomorrow we'll talk about the field and game equipment.

Play on!

Wednesday, May 1, 2013

Soccer Refereeing Tips #1

Soccer/Futbol is a world-wide sport that has a set of dedicated individuals that set out to protect the sport and ensure fairness.  Referees spend lots of "classroom" and "field work" time learning the sport and the ins and outs of their jobs before they move up to being a professional.  This week I'm going to break down some of the key areas of their training and skill sets they have.

-Getting Started-

Physically Fit:  If you've seen any game you know that the Ref must be able to keep up with the players and stay out of the players way.  Running, is a key skill.  Forward, back, side-to-side, every direction, and maybe the ability to dodge a ball.  If you haven't done a lot of running, get out a few times a week to limber up and continue to get better.

Uniform:  As with any job, you have to look the part.
Shirt-Typically yellow, check with the league to see what color they want you to have.  Typically, it also has a Velcro location for your official badge
Socks-Black, either with 3 white stripes or the USSF (United States Soccer Federation) logo
Shorts-Plain black, with pockets to carry job specific items
Cleats-Turf shoes work as well, should be black, think, would you wear white shoes with a black suit?
General-Socks stay up, shirt is tucked in
Equipment:  Without the gear, you're gonna have a problem.
-Red/Yellow Cards
-2 Flags
-Watch (NOT a phone)
-Whistle
-Pen
-Coin
-Water Bottle (doesn't do any good if you're dehydrated)

Now that you're going to take the next day to get the gear, tomorrow we're going to take a look at the calls and signals you will be making.

Play on!

Tuesday, April 30, 2013

Depression and Suicide Facts #10

-My Experiences-

Since today is the last day, I want to take a step back from pure facts and share some my experiences where depression and suicide have come up.  I have had four major situations where they have come up, today I want to share three of them.  Names and other major identifiers have been removed.

The Friend:  My first experience with depression came up when I was roughly 14/15.  Was on a camping trip with friends when I noticed one friend was sitting by his lonesome while the rest of us were setting up camp.  I went up, sat down beside him, and began to talk with him.  It came quickly, he talked about how it seemed no one liked him, and he didn't have the will to go on.  At the time, the full force of this didn't hit me, but I knew it was bad.  I responded by talking with him, showing support, and in the ways that he had made a difference for those around him.  After a half-hour (roughly) he perked up and felt better.  We went off and everything was well.  He became a strong leader and good person.  While I did a good thing, I still hate myself for the event.  Now, why would I say that?  Easy, because I didn't follow through.  I should have told one of the adults that was with us, but I didn't.  While it didn't affect me then, it affects me more now, because I now realize that if anything did happen, I would feel at fault.

The Listener:  During my senior year, a fellow student in my dorm community committed suicide.  I did not know the individual, my roommate did.  While I felt little connection to the individual, there were many people around me that did.  For the most part, all I could do was sit and listen, and often times, for those grieving, that is the best thing to do.  Once instance that sticks out to me, was something my roommate said.  He mentioned how he had just seen the individual a day prior and that he simply said hello and kept going.  He wished that if he knew more, he would have stopped and talked with him more often.  Obviously, not much I could have done, but it taught me a few things.  It taught me the importance of listening, it also taught me why it is important to check in on everyone, because you might never know.

The Co-Worker:  Just about a year ago I had a previous co-worker commit suicide.  This was a shock to all of us that knew him.  Many of us had talked, hanged out, played games, just had fun conversations with each other.  He was a good individual that made an impact on those he worked with.  While he did pass on, I did go back and thought of any signs there might have been.  For the most part, no, the only slight one I knew off was that he had emptied his Facebook of all friends and "likes."  The incident rocked us that knew him and made us keep him on our mind.  For some of us, it was the loss of a friend, to others, it was the loss of a close friend, someone who was almost like family.  This experience really showed how one can never know he is at risk.

Thank you for listening these past 10 days, I hope you have learned something and will be ever aware of your surroundings.  It'll be back to a new topic tomorrow.

No one is alone, be the light you want to see in the world

Monday, April 29, 2013

Depression and Suicide Facts #9

-Awareness-

There are several "events" throughout the year that promotes Depression and Suicide Awareness

National Anxiety and Depression Awareness Week:  May 5-11 2013
You can go hear to obtain materials to help put on your own event:
http://www.freedomfromfear.org/NationalAnxietyandDepressionAwarenessWeek.en.html

National Suicide Prevention Week:  September 8-14 2013
This week goes in hand with World Suicide Awareness Day (10 September)
http://www.suicidology.org/about-aas/nspw

Semi-Colon Project
This is a newer project, originally focused on one day (April 16th) but has continued to grow where the day does not matter.

A semi-colon is used to show where a sentence could have ended, but didn't.  Individuals draw a semi-colon onto themselves to show that they, or in support of others who face depression, have thought about suicide, or in memory of someone who committed suicide.

No one is alone, be the light you want to see in the world

Sunday, April 28, 2013

Depression and Suicide Facts #8

-Myths-

As with everything, many myths have come up involving depression and suicide, I would like to address some of them

Depression:

1. It is an extreme form of sadness or greif
2. It only affects old people, losers, and women (check out yesterday's post to review the numbers)
3. All one needs is an antidepresent to get over it (remember the number of methods there are to treat)
4. AIDs, Cancer, and Diabetes occur more often (actually, all those combined do not add up to the total cases of depression)

Suicide:

1. Peaks during the holidays (they are actually lowest in December, and highest in the Spring)
2. Teens are at a greater risk (while this is a myth, this age does determine a lot of situations that may influence depression later)
3. Minorities are leaders in committing suicide (whites tend to have the lead here, except when compared to American Indians and Alaskan natives)

Both:

1. Creativity is not linked to either (actually, most of the world's most creative suffer from depression)
2. Depression is always the cause of suicide (not quite, and 1 of 3 are caused from alcoholism)
3. Poor countries have higher rates (Nope, richer countries have the higher rates)
4. "copy cat" events don't happen (If one is witness, friend of one who commits suicide, they may become at risk for depression and then possibly suicide

These are just a small view into the world of depression and suicide myths, there are more, but these are some of the most common.

No one is alone, be the light you want to see in the world

Saturday, April 27, 2013

Depression and Suicide Facts #7

-Faces of Depression-

Today I want to take a short look at some well known names who suffer from depression.

Abraham Lincoln (16th President)-Researchers say that Lincoln's depression comes from the loss of his mother at an early age, as well as several other childhood losses.


Buzz Aldrin (2nd man on the moon)-He faced several rough years after the moon landing, including the ending of a 21 year long marriage, a quick marriage and quick divorce, and several other factors led to his acute depression and alcoholism.


Harrison Ford (Actor:  Indiana Jones, Han Solo, and many others)-He says that this partially comes from his holding in anger from when he was beat up as a younger child/teen.


This is obviously just a small sampling of individuals who had/do suffer from depression.  In each of these cases the individuals went on to do great things, not letting their depression hold them back.

No one is alone, be the light you want to see in the world

Friday, April 26, 2013

Depression and Suicide Facts #6

-Who-

Today I would like to give you a little break down who if often diagnosed with depression or commits/attempts suicide.  In short, anyone, at anytime may be at risk.

Now for the facts:

First bout of depression typically occurs during one's '30s
4.3% of the World's Population suffers from Depression (that's 299,853,552 people!)
17% of the US population will have a case of depression before their death
3.5% of males in the United States
8-10% of females in the United States

3.4% of those suffering from depression commit suicide
60% of those who commit suicide were suffering from depression

Suicide is the 10th leading cause of death in the world; 800,000-1,000,000 yearly
10-20 Million attempts each year

Tomorrow we will look at some well known people who have/do suffer from Depression

No one is alone, be the light you want to see in the world

Thursday, April 25, 2013

Depression and Suicide Facts #5

-Help-

National Suicide Prevention Lifeline:  1-800-273-TALK (8255)

It is important to understand that an individual that is depressed or suicidal might not be able to get help on their own, in that situation it is important that his/her friends, family, co-workers, etc step up to help.
Ask for Help Sticker
If you are feeling depressed/suicidal:  If you feel that you cannot control yourself or may lose control, do your best to never be alone.  If you can, share your feelings with family or friends, someone who you trust.  Even if you cannot share your feelings, spend time with them, never set yourself to be alone.  Go to a public location (coffee shop, mall, somewhere with lots of people where you will not be alone)

If someone you know is feeling depressed/suicidal:  Talk to them.  The first and best thing you can do is to talk to them.  Help them to think positive, remember, they are going to dwell on negatives, be careful.

If it appears that the situation is serious, take the individual/yourself to the nearest hospital/emergency room or call 911.  Do NOT leave the individual alone.  If you are the one at risk, find someone to stay with you until help arrives.  Remove weapons, sharp objects, drugs from the nearby area.

Hospitalizations may be necessary until the individual is able to relax.  One may need to go to a psychiatric hospital for further assistance.

The suggestions above all come from medical professionals.  Below are further resources that one may use:
-College Counseling Centers
-If in Virginia Beach, VA:  757-627-LIFE (5433)
-If in Norfolk, VA:  757-622-1126
-National Suicide Prevention Lifeline:  1-800-273-TALK (8255)
Remember, get help, if for yourself, your family member, or your friend.

No one is alone, be the light you want to see in the world

Wednesday, April 24, 2013

Depression and Suicide Facts #4

-Treatment-

Note:  The best way you can get help is to get the individual to seek medical assistance, and to let someone else know that way they may keep an eye on the individual and ensure they get assistance.
Antidepressant-The most common form of treatment given is an antidepressant.  Typically antidepressants take 2-3 weeks to kick in, thus making it important to respond quickly to individuals showing symptoms.  

Psychotherapy-This process focuses on minimalizing negative feelings and increase ones attitude towards self-worth.  There are many techniques used in this process to include open dialogue and behavior modification
Counseling-This method focuses on creating an open dialogue for the depressed individual to express their feelings and open up in a stress free environment.

Hospitalization-This situation is typically restricted to if it appears the individual may harm him/herself or others.

These are some of the basic "treatments" offered to assist an individual.  Tomorrow we will look at ways you can help someone that is depressed or has reached the point of considering suicide.

No one is alone, be the light you want to see in the world

Tuesday, April 23, 2013

Depression and Suicide Facts #3

-Symptoms-

The key to Depression and Suicidal symptoms is that the individual may show one, multiple, or no symptoms at all, which why it is key to be ever aware of those around you.

Depression:  -Low mood, tends to be seen in all aspects of life
                    -Inability to experience pleasure that are typically enjoyed
                    -Preoccupied with feelings of worthlessness, guilt, regret, self-hatred
                    -Severe cases may result in delusions, and hallucinations
                    -Poor concentration and poor memory
                    -Withdrawal from social situations
                    -Reduced sex drive
                    -Thoughts of death or suicide
                    -Insomnia (80% of depressed individuals suffer from insomnia)
                    -Hypersomnia (over-sleeping to an extreme level)
                    -Appetite decreases, results in weight-loss
                    -Agitated and lethargic
Suicide:  -Word choice
              -Talks, writes, expresses preoccupation with death or suicide
              -Complains of being a rotten person
              -Verbal hints ("be better off dead" "won't be a problem much longer")
              -Withdraws from friends/family
              -Significant changes in eating, sleeping, appearance
              -Sudden drop in performance
              -Puts ones affairs in order (giving away items, gets rid of important items)
              -Feels overwhelmed, helpless, guilty
              -Shows little interest in formerly favorite activities
              -Becomes suddenly cheerful after period of depression (found a solution)

Remember, a depressed or suicidal individual may show one, some, all, or none of these symptoms.  The best thing to do is to let someone know if you are unsure of their behaviors and ensure they get proper help if they do (more on this later).  You can go online and easily find other academic articles that further cover the possible symptoms with more detail.

No one is alone, be the light you want to see in the world

Monday, April 22, 2013

Depression and Suicide Facts #2

-Causes-

Suicide is often times brought on by depression, with that in mind, most of the causes are the same for both of them.  They can be broken down into three categories:  Biological, Psychological, and Social Factors.

Biological:  There are several ways to possibly identify depression in an individual from a biological stand point.  One, there may be a chemical imbalance.  This may be from a lack of or to much of a certain chemical within your body.  Two, it may be due to ones brain being formed differently.  This is based on newer research that scientists have found that the brain structure in certain patients may help medical professionals detect signs of depression.  Thirdly, hormones, may also play a role.  It has been found that estrogen levels, both the newer higher levels found that arrive in adolescence, and the low levels after menopause are all possible causes.
Psychological:  Ones ability to cope with depression will also determine how one will respond.  If one has low self-esteem, or a self-defeating personality they might have a more difficult time dealing with the stress presented.  There is also Attachment Theory.  This theory focuses on how if an individual "lost" their caregiver at an early age, they might very well develop depression like symptoms later in life.  There is also a dark circle when dealing depression in that the "victim" will often times blame themselves, further deepening and repeating the conditions.

Social:  Poverty and social isolation are two of the major causes of depression in individuals.  Child abuse, as well as bullying/hazing (see earlier posts about these two) also may have an effect.  It has been found that lack of social support in life may lead to depression or suicide.  It may also be internal, as in one holds negative stereotypes about oneself, further increasing the issue.
As you can see, there are a wide array of possible causes for depression which could lead to suicide.  The above are definitely not all of them, and there may be cases where it is near impossible to identify what brought on the condition.

No one is alone, be the light you want to see in the world

Sunday, April 21, 2013

Depression and Suicide Facts #1

Typically I try to rotate between formal subjects and outdoorsy/physical skills, this time I have decided to take a different course.  For the next few days I will go over several facts related to Depression and Suicide.

-Definitions-

Before I go any further into this subject, I want to define the two terms.

Depression:  n; Severe despondency and dejection, accompanied by feelings of hopelessness and inadequacy; A condition of mental disturbance, typically with lack of energy and difficulty in maintaining concentration or interest in life

Suicide Ideation:  A medical term for thoughts about or an unusual preoccupation with suicide

Suicide:  n; The action of killing oneself intentionally; v; intentionally kill oneself

The reason why I have joined these two topics is due to the fact that a high number of suicide cases/attempts have a direct connection to depression.  Over the next few days I will share insights into the causes, possible symptoms, treatment, who is affected, resources, and more.

No one is alone, be the light you want to see in the world.

Saturday, April 20, 2013

Ballroom Dance Tips #10

-Waltz-

My personal favorite, the Waltz is considered the most beautiful of the ballroom dances.  This version is commonly called the Slow Waltz or English Waltz.

Music:  Here is a wide range of Waltz music.

Dance:  As this is my favorite, I'm going to share a whole lot more of the steps.  The key to the Waltz is that it is a progressive dance (moves around the floor) and is characterized by a pendulum swing motion.  

The simple left box

The reverse turn

A slightly more advanced step (for American Waltz style), the Under Arm Turn

Now to put it all together (plus some), and notice how "slow" the dance really is
This is from the Blackpool 2010 Ballroom Dancing Pro Final 

As you can see, this dance may become quite intimate with your partner and truly shows two partners in harmony.  I hope you have enjoyed the series and will be picking up one of the 10 dances shown to take on yourself. 

Grab your partner and hit the dance floor.  Let's dance!

Friday, April 19, 2013

Ballroom Dance Tip #9

-Tango-

The Tango is one of the International Standard Ballroom dances that originated in Argentina, and took influences from Europe, the rest of the Americas, and Hollywood to become the competitive dance it is today.

Music:  Here is a good mix of music for Tango dancers

Dance:  Here is one of the basic steps to get you started.  Notice how the "follower" does not start dead in front of the leader as with many of the other dances.

I hope you have enjoyed these dances so far, tomorrow will be the last, and my personal favorite.

Grab your partner and hit the dance floor.  Let's dance!

Thursday, April 18, 2013

Ballroom Dance Tip #8

-Viennese Waltz-

This version of the Waltz is considered the original version of the dance.  The Waltz is a moving dance, following the leader to the right (forward) or left (reverse) direction.

Music:

Dance:  

Now all together

Remember, the key to this dance is to learn it well enough so you can move around the room.

Grab your partner and hit the dance floor.  Let's Dance!

Wednesday, April 17, 2013

Ballroom Dance Tip #7

-Foxtrot-

The Foxtrot is seen as the international standard dance of elegance and sophistication.  The Foxtrot first came around in the 1910s and gained momentum in the 1930s.  The song "The Memphis Blues" by W. C. Handy was the inspiration for the Foxtrot (or so he says in his autobiography).

Music:  The biggest selling Foxtrot song, is "Rock Around the Clock" by Bill Haley and His Comets

Now for a slow Foxtrot:

Dance:  This will give you a fair look at the basics

Now in full time:
Though I'm not a common viewer, Dancing With the Stars does a great job showing the various Ballroom Dances.

Be sure to keep practicing and learn some of the more complex moves.

Grab your partner and hit the dance floor.  Let's Dance!

Tuesday, April 16, 2013

Ballroom Dance Tip #6

-Quickstep-

The Quickstep is one of five dances recognized as one of the International Standard Ballroom Dances.  Good for formal and informal events, the movements are fast and powerful.  It was developed in New York during the 1920s.  Caribbeans and Africans were the first to dance in this style.

Music:  Quickstep music has a quick tempo and is rather brisk, much faster than other dances.

Dance:  This dance has turned into one with many dynamic and extensive moves.  I'll provide some videos for at least the basics.
Let's start with the men:

Now for the Ladies:

Let's put it all together in real time:
Best if viewed in full screen, it is from the WDSF World Standard Championship (these are the champions of the event)

As you can see, this is a really fast dance, remember, it is not just running around the dance floor.  Practice and see if you can be as good as the world competitors (like the last video above)

Grab your partner and hit the dance floor.  Let's dance!

Monday, April 15, 2013

Ballroom Dance Tip #5

-Samba-

The origins of Samba lie in early 20th Century Brazil, and is one of the International Latin dances.  Though, this dance has separated greatly from its original cast.

Music:  The music may vary from the original Samba, the Flamenco, Zouk, and other South American rhythms.
Above is a nice variety of 20 different Samba songs

Dance:  Another one where I can't find any specific good ones for the breakdown, but this will work.
 This concludes the International Latin dances, tomorrow we will start the International Standard with the Quickstep.

Grab your partner and hit the dance floor.  Let's Dance!

Sunday, April 14, 2013

Ballroom Dance Tip #4

-Cha-Cha-Cha-

The Cha-cha-cha is one of the International Latin dances originating in 1953 by Cuban composer Enrique Jorrin.

Music:  The music of the Cha-cha-cha is energetic with a steady beat.
The above shows a more classic sampling of Chachacha music

This video shows a sampling of more modern Chachacha music

Dance:  Steps are generally kept compact danced with minimum rise and fall.  


Remember, in Cha cha cha, the steps start on 2, NOT 1.  

Tomorrow I will go over the last of the International Latin dances, the Samba.

Grab your partner and hit the dance floor.  Let's dance!

Saturday, April 13, 2013

Ballroom Dance Tip #3

-Rumba-

The Rumba is one of the International Latin dances and is of Afro-Cuban descent.  Rumba is the slowest of the five in this category.

Music:  The music comes from a Cuban rhythm and dance called the bolero-son.  The international ballroom version comes from studies done prior to the Cuban Revolution.
Dance:  Here's a good showing of the basic steps for both the men and the ladies.  Be sure to practice.
As stated, the box step is one of the most common and popular styles for these ballroom dances.  You will see these similar steps again later.

Tomorrow I will hit up the Cha-cha-cha

Grab your partner and hit the dance floor.  Let's dance!

Friday, April 12, 2013

Ballroom Dance Tip #2

-Paso Doble-

The Paso Doble/Pasodoble is one of the International Latin dance styles and has its origins in Spain.

Music:  The music for the Pasodoble is often times heard during Bull fights, which is where the pacing for the music/dance comes from.  It is common for famous bull fighters to have a Pasodoble tune named after them.
Can you hear the bulls coming yet?

Dance:  This dance is very lively, remember, it is modeled off of the bull fight.  The leader of the dance is often times called the Matador (yes, just like a Matador)
Ready for a bull fight?

So, I did not find any great individual step videos, but this one gives you a fair showing of the basic steps to get you moving around the dance floor. 

Once again, these are only the basic steps, learn them then go back to add in more steps.  Tomorrow we will look at the Rumba.

Grab you partner and hit the dance floor.  Let's dance!

Thursday, April 11, 2013

Ballroom Dance Tip #1

This set of Tiers is going to focus on the 10 recognized forms of Ballroom Dance.  Each day I will go after a different style and will give a sampling of the movements and music.  Find a partner and practice.

-Jive-

The Jive is one of 5 International Latin dances and it originated with African-Americans in 1930s United States.  In competition it has a pace of 176 beats per minute, but it may be slowed down for different events.

Music:  The music has been called "an expression denoting glib or foolish talk" or picked up from the traditional African dance Giouba
Give the above tune a listen as you continue

Dance Steps:  There are several steps for the dancers to practice before putting it together on the dance floor.
Here is a video showing it all put together
Now let's break it down
For the men:
For the ladies:
These are the basic steps and should be enough to get you started, continue to practice with these and as you get better add in some of the more complicated steps.

Tomorrow I will go over the Paso Doble.

Grab you partner and hit the dance floor. Let's Dance!

Wednesday, April 10, 2013

Pioneering Tip #10

-The Wonders That Could Be-

If you have learned anything from the knots and lashings shown here, is that the limitations of pioneering is near limitless.  Remember, before there were steam engines and diesel fuel, before cars filled the streets and rockets were launched into space, things were tied together, many of the first objects and see how many strings were attached to them.

Horse drawn carriages turned into automobiles.  The Wright Flyer turned into the Space Shuttle.  Many different objects started as pioneering projects, how do you think the Pyramids were built?  Not by brute strength alone.

Pioneering could include theme park like playgrounds (merry go rounds and swings).  Knot tying includes decorative knots, knots used on boats and towers.  The limitation is only as far as your imagination allows.

Keep in mind, I have tied every project shown in some manner, with the exception to a number of the decorative knots below.  You can only keep going and getting better.

Keep looking up stuff to do and get creative, don't get tangled!

Tomorrow we begin a series on Ballroom Dance

Fuse it, Lash it, Tie on!

Tuesday, April 9, 2013

Pioneering Tip #9

-Climb On-

When you go climbing/repelling you will need to know a few different knots.  Depending on the type of system you're going off of, you might have to know as little as no knots, or as many as actually tying your "harness."

**Disclaimer:  Do NOT use these lines without practice and guidance.  Improper use of these knots may result in death**

Figure-8:  The figure-8 knot has several versions which can be built into climbing.
Standard-Not used to often in climbing, but does create the pattern that will be used again later.  Take a piece of rope and let a portion (8" keeps it easy) dangle.  Next, take the dangling portion and wrap it around the other piece 1.5 turns.  Once the turns are complete, stick the leading end of the rope through the upper hole.  Pull tight and you have a figure-8
Follow-Through-This version is sometimes used to join 2 climbing ropes in a manner that maintains tension, it is also very good at going over surfaces and not losing efficiency.


In the image above, steps 1-4 demonstrate a figure-8 and steps 5-8 continue the process to create a figure-8 follow-through
On a Bite-This knot is useful in order to create a bite so that you can attach carabiners to the knot and yourself.  To complete this knot, simply do the same steps as the figure-8, except this time you will fold the rope twice so that when you complete the knot, you are pulling two pieces around the line.
Prusik Knot:  This knot can be used as your main climbing device.  It is made so that when tension is put on it the knot does not slide and holds in place.  
Swiss-Seat:  You may go somewhere that does not use harnesses, in that case, you will either be free-climbing, or you will be required to make a Swiss-Seat

These are all great knots to know and use, especially to show off to your friends. 

Fuse it, Lash it, Tie on!  

Monday, April 8, 2013

Pioneering Tip #8

-Fun Knots and Coiling-

Today I wanted to get back to a few knots that are both useful and fun, as well as good ways to coil your rope.

The Shortener:  The Sheep-shank, and Man-of-War Sheep-Shank are both good knots for shortening rope.

Above, Steps 1 and 2 show the more difficult version of the Sheep-Shank.  Step 3, show the simplified version. 


The image on the left shows the 4 loops necessary for the Man-of-War and how to pull them, and the image on the right shows the completed version of the knot

The awesome thing about either version of the sheep-shank is that it will not come undone on its own.

One for Sailing:  The Mast Head Knot is used to attach the cords of the mast to the pole used to support the mast.  The key here, is if done right, the 3 loops when attached to the top of the mast pole, will only tighten the harder they are pulled.
Be wary and make sure you pull the center loop, otherwise you may complete it more like a Sheep-Shank

Coiling Rope:  When you go to store your rope, you need to consider the size of the rope, cord, hose you are using.  
Basic Coil-This is the standard one in which you just create loops to hang it easily.  To determine the size of the loop look at the length of the rope.  If the cord is rather short, then wrap it the length from your elbow to your palm.  For larger lengths, either do it between a half to full arms length.  To finish, wrap the last foot of cordage around the line and finish it off by pushing the end through the loops.
Small Coil-Ever want a way to keep your headphones from becoming tangled, but also want an easy way to slide out more cord when the length you have is to short, well, this one is for you.  Take your headphone cord in your hand and you will complete a figure 8 pattern where the two loops go around 2 fingers each (1 loop goes around the pointer and middle, and the other goes around the pinkie and ring).  When you get to the last few inches you will do like the above to finish.  The cord easily undoes itself and can be redone quite quickly.

Those are my headphones above, the coiling will help keep them untangled and ready for use

Tomorrow I'll go over some climbing knots that are useful if on a tower or not.

Fuse it, Lash it, Tie on!

Sunday, April 7, 2013

Pioneering Tip #7

-Going Medieval-

The Romans are attacking and you need to keep them away, you want to ransack the French castle, or maybe you just want to launch a pumpkin or water balloon at some of your friends, here's your chance to build your own artillery with rope and spars.

**Disclaimer:  I do not condone violence or torture, these projects are great for competitions and displays for special events**

Catapult:  The origins of catapults can be found in ancient Greek literature dating the project back to roughly 399 BC.  Today, we have tanks and other weapons, but you can build your own catapult to launch an "attack."

In the video shown, you see a simple catapult, the lashings used include:  Square lashings for the base frame and vertical frame, Diagonal lashings for the upright supports and the joints for the actual net, and a slightly loosened round lashing to attach the triangular launching piece to the frame.  The catapult also uses bug netting for the mesh to place the object being launched and ropes attached to the base of the launching mechanism that you pull to make the action happen.
Note:  You do see a lashing come undone, with projects like these, you can expect them to come loose after use and need to be retightened 


Trebuchet:  An improvement on the catapult is the trebuchet, this design tends to get better distance and may also use less supplies, maybe.

The design to the left is for a basic trebuchet design.  For the most part, the only lashings used are Square and Diagonal.  See if you can determine what type of lashings are useful here.


Cage:  Another basic project you can do is to build a cage for your captured enemies.  This project mostly consists of Square Lashings and a few Diagonal Lashings for support.  You can also add cord to go vertical or horizontal around/over the cage to seal it off (as long as you take away any knives/lighters from the captured and they don't have a taste for rope)


An important requirement for these projects is rotating joints.  A good way to do this is to use a Round lashing that is not tightened 100%.  This will create your joint for your catapult and door hinges.

Alright, tomorrow I'm going to go over a few knots (since I didn't want to make some of these project posts to long) and special rope coiling methods.

Fuse it, Lash it, Tie on!

Saturday, April 6, 2013

Pioneering Tip #6

-In the Air-

The pioneering projects I went over yesterday are all good, but, let's up the stakes.  Everyone wants to be airborne at least once, while pioneering won't be able to make you fly, it can take you off the ground.

Monkey Bridge:
These are complicated and must be made right, but once complete are tons of fun and can support a ton of weight (Note:  I've made several different sizes of Monkey bridges, the smallest being 20ft, the largest around 50ft, pictured).
The first item you want to find is a strong base rope, and strong spars to use.  You will make at least 2, maybe 3 X-frames (create an X with a Square Lashing, and in this case attaching a spar to the bottom with Diagonal Lashings, you don't want a spar on top as that hinders travel).  Next you will have helpers stand the X-frames up while someone runs the bottom rope over the intersection of the poles.  This is where you need to use tension.  You will want to pull the base rope hard enough so that there is minimum bounce and then either attach it to a tree on either end, or anchoring mechanism (3-stake system is one of the best).  Once this is secured, you will run another line on the upper part of both sides of the X-frame to create hand-lines, and wind the line around the poles so they don't slide down.  Then you will want to wrap a smaller line so that it joins the base line and hand-lines so it creates a kind of net in case someone falls.

Tower:
Ever want to go rappelling (which I do not suggest setting up a repelling line unless you are trained in climbing and repelling) or spy on an opposing campsite, you can build either an hourglass tower or a box tower.  Hourglass towers tend to combine 2 tripods strengthened with cross beams and either joined at the point where the joints come together or at a lower point and joined by Square Lashings.  A box tower is usually a set of X-frames (made using Diagonal and Square Lashings) joined in a square box shape.  You can add portions to make the tower taller, though you will want to add long cross-spars to join the different pieces.  In both towers, you can add floors using the Floor Lashing at different levels, and you can add ladders built using Square Lashings.


Hourglass Tower on the left, and Box Tower on the right

Ladder/Step Bridge/Monkey Bars:  All 3 of these items have the same general shape, just designed slightly different.  The ladder is simply two parallel bars joined by perpendicular poles attached by way of Square Lashings.  You can do the same thing for a Step Bridge by either having the beams closer together or doing a full Floor Lashing.  To make a set of monkey bars (who doesn't want to play when they go camping) simply plant 4 spars into the ground and attach the ladder horizontally to them.


The above are all projects that can give you a little bit of height, projects for you to show your dominance over the ground.  As you can also tell, once again, all of these projects can be made more complicated by using different methods, more spars, more rope, and of course, more experience.  Tomorrow we'll go a little "Medieval"

Fuse it, Lash it, Tie on!

Friday, April 5, 2013

Pioneering Tip #5

-Camp Gadgets-

If you're a scout you are required to make something using pioneering skills, if not, then you might just want to show off some skills and turn your patch of dirt into a "high-end" campsite.

Flag Pole:  This is a common gadget and also an easy one to make.  First, find two poles you want to use as your pole.  Lay them so that they overlap roughly 3-5 feet, you want them to run parallel to each other for a longer distance if the poles are heavy.  On either end of where the poles meet, do a Round Lashing or Shear Lashing.  While someone is digging a hole to put the pole in, have someone set up a halyard to raise your flag on.  You can do this by using Square Knots to join pieces of rope around the top of the pole and attaching a pulley or just a string that makes it so the halyard moves freely.


Cross:  If you are going to be out and want to put on a religious service and would like a cross, all you need are two lashings.  First, make a tripod which will serve as the base.  Next, make a cross using a Square Lashing.  Finally, tie the cross onto the tripod so that it stands straight.

Kitchen:  While out camping, you may want a simple kitchen set up to add to the space you don't have.
Drying Rack-If you have two trees relatively close together, simply use Square Lashings to attach a pole at least 3ft off the ground.  If you don't have 2 trees or only 1 tree, you can plant a pole into the ground to lash to.
Hanging Pot-Step 1, tie a tripod.  Step 2, hang a string strong enough to hold your filled pot to the tripod joint.  Be sure that the poles you use are strong enough, you don't want them to snap and lose both your stew and your fire.  To make this even better, you can make a grill with green limbs so they don't burn as easily by tying them together with Square Lashings and attaching a cord to each corner to hang from.


Gateway:  Everyone wants their site to be welcoming, and maybe you want a special place to put your group's flags or sign, why not make a gateway?  This is a simple task and requires no digging.  Start by making two large tripods (large enough that people, or vehicles) can travel under.  Next, stand up your tripods and lay a beam across the top to make the gateway the size you want.  For extra strength, use Square Lashings to attach support beams around the tripods so they don't slide.


Latrine:  A simple item, that must be built right and may get a fair amount of use over the course of a weekend, as the saying in Jurassic Park went, "If you gotta go, you gotta go."
By looking at the image to the right, you will have to ground the four main poles into the ground.  You will then use Square Lashings to join the 4 base poles, and then Square Lashings again to the other beams to hold them in place.  Dig a trench underneath the project (at least 3ft deep) and leave the dirt to the side with a shovel.  As the latrine is used, an individual should add a little bit of dirt back to the trench.  Remember, latrines should be set up at least 100ft from where you eat and sleep

These are all simple Camp Gadget projects.  Each of these can be expanded upon to make them bigger or more magnificent.  Tomorrow we'll talk about getting projects off of the ground.

Fuse it, Lash it, Tie on!

Thursday, April 4, 2013

Pioneering Tip #4

-Lashings-

Lashings are used to join 2 or more poles together.  Below are examples of the most common and most useful types of lashings.  The key with all lashings is to remember to keep them tight, otherwise they lose their support and purpose (essential for certain projects).  Also, when discussing wraps and fraps, my suggestion is at least 3 wraps, and 2 fraps.  Generally this number and 3/2 ratio is the golden mark for just about every lashing.

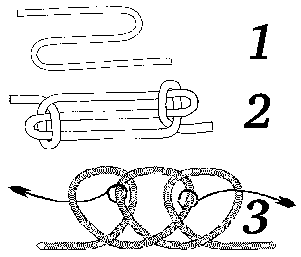
Round Lashing:  This lashing is most commonly used for flag poles or simply creating a longer pole.  When used, you must use two together, or one Round and one Shear Lashing.
To make the Round lashing, start by making a clove hitch on one pole, then wrap around both poles in one direction, this is one of the few times where you will more likely do at least 5 wraps.  You will not frap on this one.  To finish, tie a clove hitch on the pole you did not start on.

Shear Lashing:  This one is similar to the Round lashing, except it actually goes between both poles instead of just around.  Again, this lashing is best if used with another or with a Round.
To make the Shear lashing, make a clove hitch on one pole, similar to the Round lashing.  Now, you will complete a figure-8 pattern around the two poles for at least 5 times.  Once you have completed that, you will then frap 3-4 times around the wraps.  You will finish by making a clove hitch on the opposing pole.

Tripod Lashing:  The movements for this lashing is the same as the Shear lashing, except it includes a third pole.  As in it's name, the Tripod lashing is used for making tripods.

The image above is of a Round Lashing, take note that they did a clove hitch around both poles to start and finish the lashing.  Do NOT do this.  This may weaken the lashing long-term

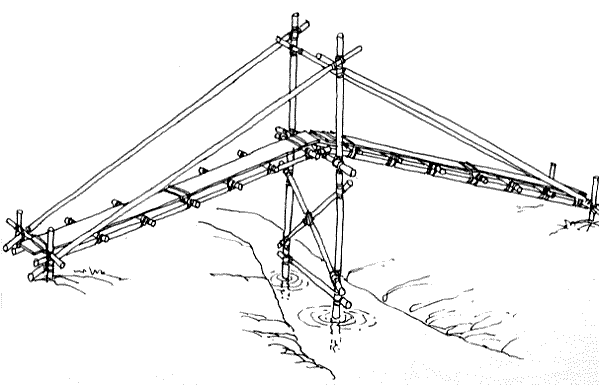
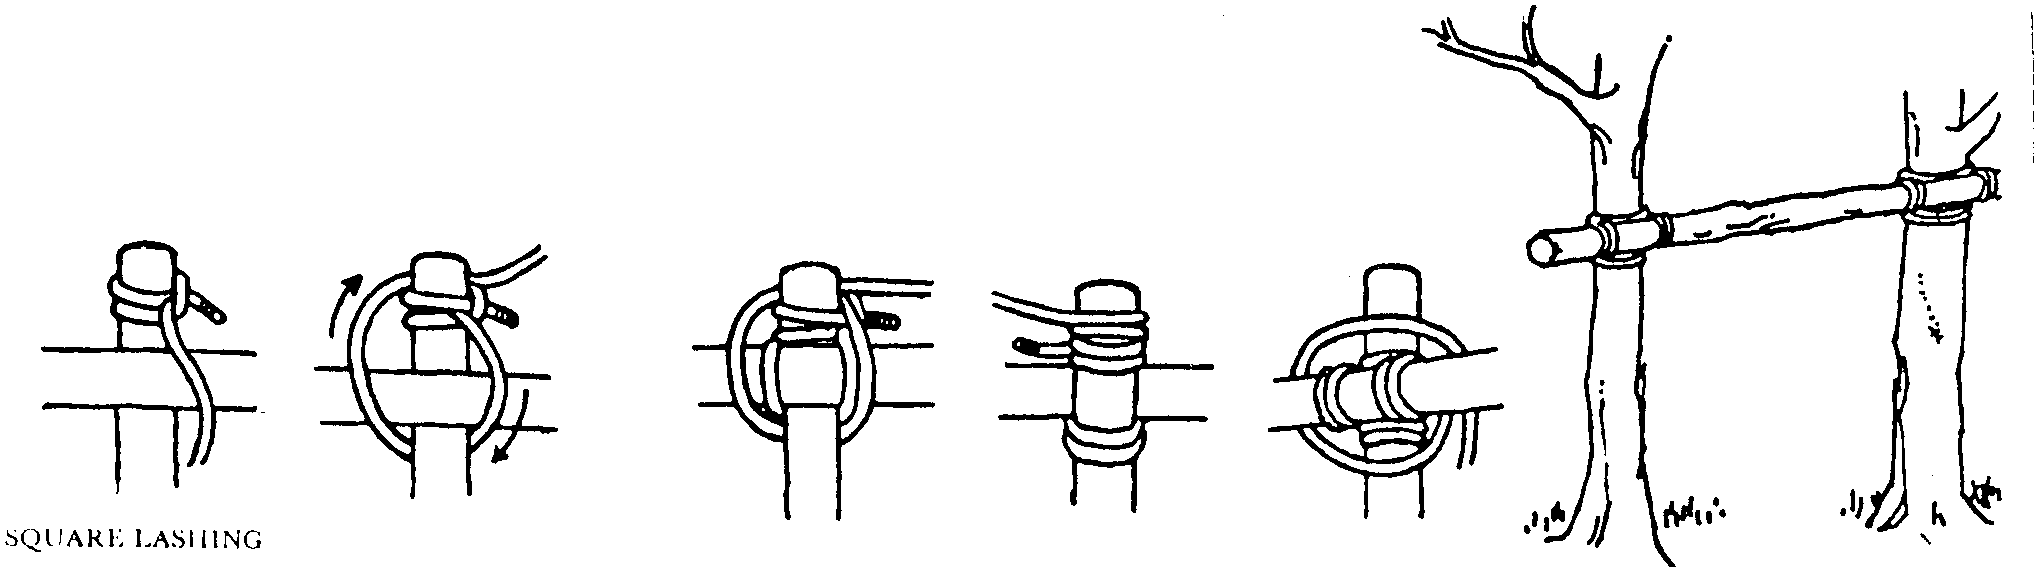
Square Lashing:  This lashing is used to join two poles that are coming together at 90 degrees to each other.  This is a very common framing lashing.
To tie this lashing, you will start by making a clove hitch on one of the poles, relatively close to the crossing point.  You will then do at least 3 wraps in a box shape, going over and under the pole.  You will then complete at least 2 wraps around the wraps.  To finish, make a clove hitch on the pole you did not start on.


Diagonal Lashing:  This lashing is used to join two poles that are coming together at an angle other than 90 degrees.  This is another framing lashing.
To tie this one you will start by making a timber hitch around the center of the two poles.  You will then complete wrap in a manner that crosses over the two poles 3 times between two openings and then 3 times through the other two openings, and do 4 fraps around the wraps (Remember:  3/2).  You will finish by making a clove hitch onto either pole.

floor lashFloor Lashing:  As with its name, this lashing is used to make a lashing.  Generally you will have two framing poles (possibly put in place with Square Lashings), and multiple poles of similar diameter and length to use as your floor, the more pieces you have, the closer the flooring can be.

To make the floor lashing you will start by making a clove hitch to the framing piece.  Then you will lay the flooring pieces on the frame.  You will then wrap over the floor piece, then go under and over the framing piece to secure it together.
You may do the bite method as shown in the picture, or you may simply repeat the previous step for each beam.  I personally prefer this model as I find it to handle better.


The above are some of the most common types of lashings and the most effective ones for pretty much every project.  Beware of other images and descriptions online that have the same names, as above.  Though, there are versions that have "longer" names, such as the Japanese Square Lashing, though you should only attempt those after you have practiced the others, as these types tend to be more difficult to keep tight.

From this point forward I will focus on different camp gadgets and pioneering projects that you can build on your own.  I will also include a daily knot that I think is both interesting and useful.

Fuse it, Lash it, Tie on!

Wednesday, April 3, 2013

Pioneering Tip #3

-Need to Know-

Before we take on the more "complicated" activities, we need to go over a few things.

Leading End:  The leading end of a piece of rope is the part of the rope that you are using to tie with.

Bite v Loop:  A bite is when the rope is laid so that the line does not cross.  On the side, a loop is where the rope crosses over itself.

Overhand v Underhand:  Should be easy enough, but, overhand is when the leading end crosses over the rope, and underhand is when the leading end is goes underneath the line.

Hitch v Knot:  The key difference here, is that a hitch is attached to something such as a stake, pole, spar, tent, etc, where as a knot is only attached to itself or another piece of rope.

Wrapping v Frapping:  When we start talking about lashings, there will be two movements talked about, wrapping, and frapping.  Wrapping is the first movement you will do, and goes around your poles.  On the other hand, frapping is typically done around the wrappings in order to tighten them.

Lashing Hitches:  There are two hitches that you need to know before we get to lashings, as they are used to start most lashings.

Clove Hitch:  This is possibly the easiest hitch out there, think of it as an "X" with a line through it

Timber Hitch:  This one actually has two purposes.  It is used to start lashings, however, it is also used to pull timber (yes, that is where the name comes from).

Now the key, is to remember to practice and remember all of your knots, as you do more projects, you will find that you will use more and more of them.

Fuse it, Lash it, Tie on!

Tuesday, April 2, 2013

Pioneering Tip #2

-Basic Knots-

Today I'm going to share some of the most common knots out there and their uses.

The Joining Knot-The Square Knot is used for joining two pieces of rope of similar size.  The simple step here is right over left, then left over right (similar to tying your shoes).
The Securing Knots-The Two-half Hitches and Taut-line Hitch are used to secure items so that the rope may be slid to different lengths and still hold tight.  They are very similar (the Taut-line only has one extra loop in it).  These knots are often times used to create an outrigger for a tent or shelter.
Two-half Hitches on left, Tautline Hitch on the right
The Saving Knot-The Bowline is a knot used for saving lives.  When talked about, it is either described as a bunny going around a tree or by how it can be tied around one's waist.  There are also upper tiered versions of this knot (double, triple) that have added use.


Tomorrow I'll go over some basic terms as well as a few more knots before we get into the "complicated" stuff.

Fuse it, Lash it, Tie on!

Monday, April 1, 2013

Pioneering Tip #1

-Rope-

An important skill to know for any outing, trip, event you go on or put on, knot tying, lashing, and other skills will all be an essential skill to know.  Over the next few days I will cover a wide variety of skills for any outdoorsman, and how they can relate to other daily tasks.

2 Types:
There are two types of rope, natural and synthetic.  Natural fiber rope is very much like twine or cotton.  This is where rope started, though at one point it also included grass, vines, and other fibers that can be strung together.  Synthetic rope is usually like nylon, a polyester mix, or other material, 550 Cord is a common type of synthetic.

From my experience, natural fiber rope is easier to work with in that some synthetic materials take a little while to "break in".  On the other hand, synthetic is more likely to hold up to poor weather conditions and not rot as quickly if left in the rain.

Protect the Rope:
You may have rope that begins to fray and fall apart, it is important to protect your rope to prevent further issues.  As there are two types of rope, there is a different way to protect each.

Natural Fiber-For natural fiber rope you are going to want to whip the ends of the rope with a small synthetic piece of string.  You do this by forming a bite in the string, then laying it against the end of the rope, you wrap the string around the rope for about an inch.  At the end of the inch, you push the rest of the string through the bite and pull the other end so that the bite is pulled under the wraps.
This is a good video showing my personal selection for whipping.  Note:  he did this on a synthetic piece just for the example, and you also want to push the whipping towards the end of the rope when finished, do not leave it far from the end.

Synthetic Rope-Fuse the ends of the rope.  Simply hold the rope over an open flame, let it head up and melt.  For certain sizes it will fuse on its own, for larger sizes, severe fraying, or when multiple pieces are involved, you may have to squeeze the pieces together (I suggest not by hand, and yes, this is from personal experience).

 Fuse it, Lash it, Tie on!