Sunday, March 31, 2013

Dining Etiquette Tip #10

-Special Rules-

Today I wanted to look at a few international/common items that you might run into based on where you travel or who you hang out with.

Japanese Tea Rules:
Before taking up your cup, bow to any other guests who have arrived, before the tea arrives.  Pick up the cup with your right hand, bring to chest level, hold there with both hands for a moment.  Turn the bowl clockwise 2 quarter turns, drink the tea in several sips.  When finished, turn the bowl counter-clockwise 2 quarter turns so that it is back in its original position.  Place the bowl in front of you on the tatami just inside the seam.  When finished, make a formal bow to the host.

Chopsticks:
(If they are given in paper) Slide the chopsticks out, lay them North-South, with the blunt/joined end to the north.  Take the wrapper, hold it horizontally, then tie it into a knot, place to the right side of your plate (near 2-o-clock position), rest the mouth end of your sticks on the knot.  If they must be snapped, snap them in your lap, not over your food.  Use chopsticks with everything (including soup), the one exception is sushi.  Chopsticks should always rest together, parallel to each other.
NEVER use them to:  spear food, point, separate them on opposite sides of the plate, make an X, stick them in your rice so they stand up.
This was a basic look at chopsticks to get you started, though there are other rules that you should learn before you travel.
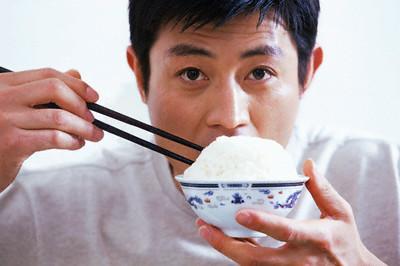
Note:  It is key that the food is brought to chest level or higher while using chopsticks

Kosher Foods:
These are foods that follow Kashrut, a Jewish dietary law.  Animals acceptable for eating must be "clean" the "test" for this is if they eat the cud and have cloven hooves.  This also removes byproducts of ritually unclean foods.  Anything that is served must also not contain blood as it is "life".  Depending on how orthodox the Jewish hosts/guests may be, it may be common to not accept fish and poultry during the same meal.
For more guidelines you can read Leviticus and Deuteronomy, or ask a Jewish friend/family member.

Muslim Eating Etiquette:
Never eat with the left hand, it tends to stay at your side for the entirety of the meal, this is due to the left hand being seen as impure.  It is common for women to not eat with the men.  Hands should be washed before and after the meal.

These are just a small view into some specific guidelines that exist, as with the past few days.  Remember, no matter if you are staying in the states or you are traveling abroad, educate yourself on accepted dining etiquette rules.

This is the end of another series, and the topic for next time will be:  Pioneering

 Bon appétit!

Saturday, March 30, 2013

Dining Etiquette Tip #9

-Across the Pond-

Today I'll finish the series of hitting up some international dining etiquette.  Today's focus is on Africa, the Middle East, and Asia.

Africa:
Egypt-No pork, No eating with the left hand, No alcohol.  It is better to return for more than to have a large first plate.  Men and women may be asked to eat separately, maybe even in different rooms.  Food will be served in this order:  Head, oldest man down, children, women.
Sudan-Food is generally only eaten with the hands, only use the right hand
Morocco-Dining usually done on a rug or carpet.  If eating from a communal bowl, eat from the portion closest to you.  Never put your hand into your mouth as you are eating from the communal bowl.
Tunsia-A communal water glass may be used.  Take a drink and then pass it around, be careful of water quality.

Middle East:
Iran-Dress conservatively, and if your host is not wearing shoes (if at the home) then remove yours.  Meals are usually served family style, and there tends to be an abundance of food (it is good culture to shower your guests in abundance).
Israel-Men and women may dine in separate rooms in more orthodox homes.  Never invite your guests to socialize on the Sabbath unless he is rather not highly religious.  Always assume your host follows the eating of the Kosher foods.
Saudi Arabia-You may be given all 3 utensils, or none at all.  Alcohol and pork will tend to not be on the menu.  If invited to a meal, you may be offered to seat first, allow the host and honored guest to seat first and then see if they offer any more guidance.

Asia:
Australia (not really Asia, but grouped in this category)-When not using utensils, your hands should be on your lap.  You may be required to share a table at informal restaurants, be aware.
China-The business meal will be more so of a banquet, also, women may only participate if they are seen as equal business equals.  Compliments are expected, praise the food.  Each dish will tend to have its own set of serving chop sticks.  Never refill your own glass, refill your neighbors.  Do not tip in China, it is illegal.
Japan-Tea has it's own set of rules, follow them closely.  Greet other guests with a slight bow.  Tipping is generally not done.
South Korea-While rice is offered at most meals, it is not necessary to eat every grain.  The most honored position of seating is at the middle of the table.  You may be required to share a table at a restaurant, do not force conversation, act as if they are two private seatings.  Tipping is not common, a 5% tip will be appreciated.
India-You will be expected to wash your hands at the start and end of a meal.  If you feel the need to use utensils and they are not presented, it is fine to ask.  Tipping is required, and then more (at least 10%).
Turkey-If you are the honored guest, you will be expected to give a toast.  Smoking is common in Turkey, it tends to happen between meals/courses.

The world is a grand place, it helps to know a little bit about where you are going.  The last two days I have dived into different worlds to show you just a little of the various guidelines that exist.  Tomorrow I will wrap up by looking at a few special rules for eating certain items.

Bon appétit!

Friday, March 29, 2013

Dining Etiquette Tip #8

-Going International-

Today and tomorrow I want to break down general dining etiquette from around the world, you never know when you might be out traveling.  Today I'll hit up the rest of the Americas and Europe.

Central America:
-Believe:  When you finish a meal, push the plate away and lay the silverware parallel on the side of the plate.  If given a tortilla, then tear it apart to eat it
-El Salvador:  When out, you may find that locals will order the wait staff around, if you do so, be polite when doing this for yourself.  When giving a toast, say "Salud" (Health), and include a part of how you're happy to be in the country.  Tipping is not customary
-Guatemala:  If you place both pieces of silverware on your plate at any time, you are signaling to the wait staff that you are finished eating.  Your hands are expected to be above the table any time you are not eating. It is good to eat everything on your plate, even better to ask for seconds (Hint:  take a smaller portion to start and then go again later).  Generally you will not discuss business at a business breakfast or lunch (dinner is reserved for the family), follow your Guatemalan associates for guidance in this.

South America:
-Brazil:  Pass food to the left.  Waitstaff may be summoned by eye contact, be aware of wondering eyes.
-Peru:  Amount of food served is based on the groups business class.
-Chile:  When pouring wine, do not pour backwards, as it means you dislike the person you are serving.

Caribbean:
-Cuba:  Waving or calling the names of wait staff is considered very rude.  If invited to someone's home for a meal, the host will tell you where to sit.  If you tip (not required/not illegal) pass the tip to the wait staff, do not leave it on the table
-Haiti:  It is in poor taste to leave the table during a meal.

Central/Eastern Europe:
-Czech:  The more you drink, the more you are offered.  If not using hands, they are expected to be visible, rest your wrists on the side of the table.  Follow more senior members into a room (as in reverse of common US Military customs).
-Poland:  If soup is served without a spoon, then you are to lift and drink it.
-Russia:  Alcohol is generally only had with dessert.
Western Europe:
-England:  Make reservations for meals, as dinner usually starts at 8pm and serving ends at 11pm.
-France:  Never cut your lettuce when served salad.  You are expected to eat all the food on your plate and not ask for seconds.
-Sweden:  If invited to an associates home, follow his/her lead for the discussion, and you will be expected to remove your shoes.

Alright, the above is just a small sampling of varying etiquette guidelines, learn a bit more about the nation you are traveling to before you go.  Tomorrow we'll hit up Africa and Asia.

Bon appétit!

Thursday, March 28, 2013

Dining Etiquette Tip #7

-The Before and After-

Here are some generally accepted guides to get you "to" the meal and "out" of it.

Reservations:  Make reservations at least a week ahead, for certain holidays you might have to do so a month ahead.  The host should call ahead if the party is expected to be up to 15 minutes late.  If you find out that you must cancel, do so right away, that way the restaurant may open it for another group, especially if you reserved a large section.

Dress Code:  Look at the invite and see if there is a dress code, if there is not one, look to see what everyone else will be doing, if in doubt, dress up

Arrival:  Arrive at least 10 minutes early, Do NOT be late.  Think of it this way, "early is on time, on time is late, and late is unacceptable" (often times at Plays, if you arrive late, you will not be allowed through the doors)

Prayer:  A prayer might be offered at the start of the meal, and will usually be led by the Host.  If you do not want to participate, simply sit silently and wait for the end.

Toasting:  If a toast is offered, join.  If the Host stands to give the toast, then the group should also join.  (The later rule may be ignored at Weddings when you have certain key people giving toasts)

End of the Meal:  When tea or coffee is offered, it represents that the meal is over.  If all else was completed at the earlier portion of the meal, then guests may feel free to leave.

Thank You:  If you were invited to a formal private party, then it is courteous to send the Host a thank you for inviting you.  You do not have to do this for general business meals.

Remember, Never be late, dress to impress, follow along, and be courteous

Bon appétit!

Wednesday, March 27, 2013

Dining Etiquette Tip #6

-Tipping-

When you go out to eat you will be faced with a check and tipping the wait staff.  Here is a good breakdown for you.  Remember, a Gentleman/Lady always leaves a tip, no matter the service.

15%:  This is the average tip amount that you should leave on a bill.  Even for poor service, you should give at least 15%; keep in mind, everyone has a bad day, and often times the tip goes to more than one person (it may go to the Bar Staff, Cashiers, and others beyond just the Wait Staff).  Note:  If you are at a Buffet, then you may tip less, a fair amount is 10%)
  
iTipping.com
15% and 20% Tip Table
Check15%20%Check15%20%
$1.00.15.20$32.004.806.40
2.00.30.4034.005.106.80
3.00.45.60 36.005.407.20
4.00.60.80 38.005.607.60
5.00.751.0040.006.008.00
6.00.901.2045.006.759.00
7.001.051.4050.007.5010.00
8.001.201.6055.008.2511.00
9.001.351.8060.009.0012.00
10.001.502.0065.009.7513.00
12.001.802.4070.0010.5014.00
14.002.102.8075.0011.2515.00
16.002.403.2080.0012.0016.00
18.002.703.6090.0013.5018.00
20.003.004.00100.0015.0020.00
22.003.304.40120.0018.0024.00
24.003.604.80140.0021.0028.00
26.003.905.20160.0024.0032.00
28.004.205.60180.0027.0036.00
30.004.506.00200.0030.0040.00
Copyright © 2006 iTipping.com
All Rights Reserved.

With Coupons:  You may have a coupon that allows for 20% off of your bill, even though that is what you will pay, you should still place a tip based on the total price before any discounts.

Group Gratuity:  If you are in a group, check to see if a gratuity has already been added to the bill.  If it has, you do not have to pay anything more, if not, then consider paying a higher gratuity (20-25%) due to the higher amount of work associated with serving a group.

Time=Money:  This is a time old saying, and just like in business, it is the same thing in the food industry.  If you spend a long period of time during a seating (2 meal times+) then you should add an extra 5% gratuity.

The above are just some simple guidelines of tipping etiquette, focused on dining, there are other rules for other services, be sure to educate yourself.

Remember:  Tipping is based on the full amount and services rendered, not one or none.

Bon appétit!

Tuesday, March 26, 2013

Dining Etiquette Tip #5

-What Not To do-

Here is a break down of simple things that you should not do during a meal.

If you have a piece of food that is being difficult to get on the fork/spoon, use another utensil or piece of bread to push it on, do NOT use your fingers

If you have a piece of food that might "explode" like grapes when stabbed, roll it onto your fork, do NOT make a mess

If you have leftover food, do NOT ask for a doggy bag (an exception is for informal events with friends)

Do NOT ask to taste someone's food and do NOT offer your food to others.  This looks poor not only to your boss, but also to the wait staff and kitchen.  (Remember, this is for business dining, there may be exceptions for couples dating, but don't cross this territory unless you've reached that point)

Do NOT talk with your mouth full, and do NOT chew with your mouth open.  This may sound like something that you have been told since you were able to eat on your own, well, some people need reminders

If your soup is to hot to eat, do NOT blow on it and do NOT put an ice cube in it.  Remember, sophistication, you are not 5, wait a minute or two to let it cool.

Do NOT place your cover/hat on the table.  Either place it on your belt/backside, floor under your seat, or in the bars of the seat, or better yet, if there is a place to store hats/coats at the restaurant/location, use it.  This is good to know for both military and civilians.

Do NOT blow your nose at the table, try to excuse yourself to the restroom and do so.  Remember to wash your hands before returning.  If you have to cough, use your napkin to cover your mouth.  If you cannot get control of your coughing, then excuse yourself.  Do NOT sneeze/cough into your hand, if you must, do so into your elbow, but do your best to avoid this.

Do NOT skip out on the tip.  (More on this tomorrow)

Remember, while out, general etiquette follows you into every form of etiquette, do NOT be the one who stands out because you are acting like a five year old at a formal function.

Bon appétit!

Monday, March 25, 2013

Dining Etiquette Tip #4

-Let's Talk Business-

It's an almost guarantee that at some point in your professional career your boss/manager/team lead is going to have you/your team out for a lunch, you may even have an interview lunch.  There are several simple etiquette things to remember while dining.

What to Eat?:  When you go to select your meal, this is your chance to show your sophistication and knowledge.  When you order, choose a meal that is relatively clean and uses utensils, this is rarely (note:  there may be special occasions where this does not hold true) a time where you want to order buffalo wings. Use the dining skills you learned in the past posts.  Plus, you do not want to constantly be going for napkins (the point of the napkin is to not use the napkin).  Also, choose something that shows a mix of health and culture.

What to Drink?:  Water.  As it is, water is the easiest solution to the situation.  If you are at an interview, do NOT order alcohol, it looks poorly on you (an exception would be if you are interviewing for a position at a winery, brewery).  Also, water is a healthy selection, and you can't go wrong with it.  Remember, during an interview, your future employer is testing you the whole time, so be wiser than him/her.  There may be times, such as special functions: recognition events, parties, etc, where you may partake in alcoholic beverages, just keep in mind not to drink to much.
When to Talk?:  During a business meal, you have until the food is ordered until the food arrives to get out all business talk.  Before that the talk should focus on food choices, and introductory remarks, and once food arrives the atmosphere should relax to more friendly talk.  This is good because it limits the business conversation, however, it may be negative because it turns the interviewer's/manager's attention to breaking down your other side (don't let your guard down).  Note:  This may be different based on the event, follow the atmosphere and the leader.

The Check:  When the check arrives, there are several things that may happen.  If the company is going to cover the cost of the meal, typically the manager/interviewer/boss will cover the tip (since the company has the rest).  If the "big man" is covering the bill, then the best thing to do is to offer to cover the tip, it looks good.  Finally, if it is decided that both parties will cover their part of the bill, then each party should put in for an equal amount for the tip.  Remember to follow the leader, if you are not sure which option is going to happen, offer to pay your portion, the "big guy" will either agree or announce that they will cover it.

Remember:  Follow the Leader

Remember:  You are always under a microscope

Bon appétit!

Sunday, March 24, 2013

Dining Etiquette Tip #3

-Simple Food and Beverage Etiquette-

Here are some basic food guidelines to follow while enjoying your meal.

Don't Cut the Bread:  The knife is there, it's easy enough, or is it?  When presented a loaf of bread or a roll, one is to break the bread with their hands, and use the knife to spread the butter, margarine, honey, etc.

Horderves:  You may arrive to a meal/event early and horderves, might be offered.  When presented, remember, they are not your meal, they are an appetizer, take one or two.  If it gets down to the last one and in a group, before grabbing for yourself, offer to another.

Clang to Attention:  At a special function glasses might be raised in a toast or used for signaling, be careful what you do.  If there is going to be a toast (or a set of toasts), do not take a drink from your glass (if you have both water and wine, you may drink from the water as the wine one will be used for the toast), until it is time for the toast.  Do not clang a piece of silverware on your glass, especially to grab the attention of a server.  For one, this may be considered inconsiderate (at least in the US) and if it is a business/formal meal, the person in charge may use such an act to get the audiences' attention.

When to Season:  Don't dash it until you've tried it.  Basically, if you are being served food, do not season the food until you have tasted it, otherwise it may be disrespectful to the cook.  This is the standard for the USofA, it may be different overseas.

Finger's Away:  When you're out, you are not at home or a kids party, if you are at a formal function, then you are to use your silverware to eat, there is no such thing as finger foods.  WAIT, there is one exception, and that is asparagus, this is the one food (as long as it is not prepared in a sauce or mix that would make it a mess) that you can eat with your fingers.  Also, say you put something in your mouth and find it is to big or to hot and must take it out, once again, keep your fingers away, whichever utensil you used to put it in, you will use to place it back on your plate.

Cut and Eat:  You may find yourself presented with a nice piece of steak, do NOT go straight to cutting it into a bunch of pieces and eating away at your masterpiece.  The general rule is cut out 3 chew-able pieces, replace your knife, then eat the 3 pieces, then repeat.  Note:  Once you have used a utensil, do NOT place it back on the table, let it rest on your plate/bowl, just not at the 5-o-clock position.

No Plate Spinning:  Remember, this is not kid-you, this is sophisticated-you.  Typically, when placed, your main course will have the protein nearest you.  What this means, is you do not turn the plate to move the vegetables closer to you, instead you leave the plate how it is and eat as you like, no need to move it closer.  Note:  if the protein is placed further away, move it closer, as this prevents drip/mess over the rest of the food. 

There are many ways to eat using your utensils, here is a generally accepted method:
It also does a good review of the other skills

Remember:  Class and sophistication, show-up your fellow party members at your next major function.

Bon appétit!

Saturday, March 23, 2013

Dining Etiquette Tip #2


-Basic Gentlemanly/Ladylike Behavior-

Today I'm going to hit on some of the things we think we know, and actually do the wrong thing.  Don't worry, I'm here to help!

Sitting at the table:  Here's the rule, men, you sit last.  General etiquette dictates two sitting standards, one, the man politely lets the lady sit  first (in today's era he does not have to pull out/push in the chair, but hey, it's a nice touch), two, when a lady goes to leave/return to the table, all men at the table should stand.

Sitting Position:  At a meal there are two formats that may be used.  The first is the Square Table with a Head Position, in this case, the other members of the group will sit after the head individual has taken his/her seat (this is the same for formal military meals, as well as business meals).  The second is a more generic seating where everyone is equal, in this case the party is usually seated male-female around the table, and the men sit after the ladies.

Passing Food:  The rule here is "Offer Left, Pass Right."  This prevents the person to your left from being last (though they can decline) and it provides an easy way to pass items around the table.

Keep the Twins Together:  The "Twins" are the Salt & Pepper Shaker, and no matter if an individual only asks for one of them, you are to pass both, think of them as soul-mates.

Napkin Placement:  When you take your seat at the table, the first action you should take is to take your napkin and place it on your lap.  If you must leave temporarily, place your napkin either on your seat or on the right side of your plate.  When you are finished with your meal, place the napkin to the left side of your plate.

End of Course Silverware:  Once you have finished a course, place the silverware of that meal together at the 5-o-clock position on the plate/bowl.

The "Head" of the Table:  Obviously this is an important person, either an employer, commander, family elder, which ever, the key here, is follow his/her guide.  You will sit after him/her, he/she will take the first bite of their meal, and they will drive the conversation (may be more relaxed based on the event and size of group).

Start Eating:  Depending on the size of your party determines when you will eat, sorta.  If you are in a small group (5 or less), then wait for everyone to receive their meals before digging in.  If you are in a larger group (6 or more) then you may go ahead and eat as your food arrives.

Hint:  Follow the Leader, then follow the Lady

Hint:  Napkin on the Lap until Silverware goes to 5

These tips focused more on general behavior guidelines rather than food guidelines (hint hint)

Bon appétit!

Friday, March 22, 2013

Dining Etiquette Tip #1


In life, it is important to be able to know appropriate dining etiquette either for a business meal, a special affair, or if you're putting one on.  For the next 10 days I'll hit on some of the major and some of the not well remembered tips and hints so you can wow your next meal mates.

-Place Setting-

You get to dinner, it's a formal affair, and you are shocked to see the most set up setting of silverware and dishes you have seen, here's a breakdown to help you figure out what's what
Note:  This is not the most horrid it would be, but will give you the basics

For this we will work from the center, then start at 1 o-clock and move clockwise

Course Plates/Bowls:  Typically when you arrive at a location you will have a single plate, or bowl placed at the center of your spot.  If you are having several courses, then the plates/bowls will be brought in and out (except for the base plate which stays for every course except desert).  If there is only a soup and main course, then the soup bowl will often times just be on top of the course place (this may differ depending on the event).

Glasses:  In this case, it may be easy, or challenging.  If there is a regular glass, that's for water, and if you have a goblet it's for wine.  If they are all goblets, then size does matter.  The largest goblet will be for water, the next one down for red wine, and the smallest for white wine, often times in a left to right fashion.

Spoon and Knife:  The spoon and fork for your meal will be as shown, always, with the knife closest to the plate and the spoon on the outside.  If there is a separate soup course, the soup often times is provided with a soup spoon, similar to a special spoon for pasta.

Napkin and Forks:  The Napkin will typically be placed under the forks, though for certain formal affairs it may be on the center of the plate.  When it comes to forks, they often times identify the number of courses (2 forks=2 courses).  They are also easy because you typically work your way in (towards the plate) as the courses go on.  Usually a salad fork on the outside, followed by a seafood fork, and then the main course fork.

Bread Plate:  Above the forks will be the bread plate, it will usually have it's own small knife to be used for butter.

Center-top Silverware:  If there is a desert course or extra course, then the required utensils will be placed centered above the main course plates.

Hint:  If you forget where the bread and drinks go, hold out your hands, and put your thumb to your pointer-finger, one will make a b (for bread) and one will make a d (for drink).

Hint:  Placement is in favor of Left-handed people (forks on the left, knife and spoon on the right)

Hint:  Desert is last, so those silverware items are furthest away

Hint:  You don't want to leave the meal intoxicated, thus you have a larger water glass than alcohol glass

As you set-up your own placements it will become easier and easier and you won't have to reference another set again and you can stun your date when you go out next time.


Over the next few days I will focus on appropriate behavior, food rules, business meal rules, and others to help you navigate the world of dining etiquette.

Bon appétit!

Thursday, March 21, 2013

Backpacking and Hiking Tip #10

-Experience-

View from the actual Marbleyard at Devil's Marbleyard

As you go on trip after trip, be it a backpacking trip or a hike, remember, experience.

Experience the Trip, don't let challenges or hurdles, or something strange throw you off, take in every moment of it, it offers something special that you may remember for the rest of your life.  If there is bad weather, I find those to be the most memorable trips, as well as those when there was a mistake made.  Memories are made, not bought.

Build your Experience, as you go on each trip, use what you learn to build your knowledge and do better next time.  You may come across a fellow traveler along the trail, maybe someone who knows more, maybe someone that knows less, share your knowledge and experiences, it's a good way to learn more and make friends at the same time.

This is the end of my Backpacking and Hiking series, the next set will focus on Dining Etiquette

Wednesday, March 20, 2013

Backpacking and Hiking Tip #9

-Leave No Trace-

When you hit the trail, it is important for you to take care of the land you travel on so that the next travelers can enjoy it just as you did.

Here's a short "story":  You go on a hike in the forest and witness an old stone chimney made up of many small stones.  As a traveler, you want a special memento to remember this trip, you decide to take out a rock.  Now, for every ten travelers that come by and take a rock, the old chimney slowly becomes more and more unstable and eventually collapses.  When you come back some time in the future to show the chimney to your children, you find just a pile of rocks.

The Leave No Trace Principles are designed to ensure every generation gets to enjoy the same world as previous generations.  There are 7 Principles:

1)  Plan Ahead and Prepare:  Know the rules for where you're going, prepare for weather hazards, try not to go on high frequency times (esp. holidays), travel in small groups (if possible)

2)  Travel and Camp on Durable Surfaces:  In short, if there is a pre-established path or camping area, use it.

3)  Dispose of Waste Properly:  Pack it in, Pack it out.  This may not only apply to normal trash, but also bodily waste depending on the location

4)  Leave What you Find:  Remember the story from above, protect the environment, ensure future generations get to enjoy the land as you have.

5)  Minimize Campfire Impacts:  Only build a fire as large as is necessary.  For an "unnecessary" fire, follow the 1'x1'x1' rule.

6)  Respect Wildlife:  You are in nature's home, not yours, respect the land and creatures that live there.

7)  Be Considerate of Others:  Keep your voices low, if you are going to relax, step just out of view of the trail, keep any animals with you under control, ensure other travelers get to enjoy the world just as much as you have enjoyed it.

Learn more at the official LNT website:   http://lnt.org/


Tuesday, March 19, 2013

Backpacking and Hiking Tip #8

-Animals-

When you get ready to hit the trail, take a look to see what type of animals you might have to face while out.

Here is a break down for North America, if you're heading out internationally, be sure to look up wildlife native to the land(s) you are heading to.

Horses:  Ok, so this one is not strictly domestic the N. America, but you may come across them.  If you are coming across a horse on a trail that is coming towards you, turn and go downhill, that way you do not appear large and menacing to the horse.


Venom:  There are multiple species of animals that are venomous and are dangerous to you if they believe you are hostile.  In N. Am. there are 4 species of poisonous snakes:  Corral, Rattle, Cottonmouth (aka Water Mocassin).


There are also species of venomous spiders (such as the Black Widow).  Learn about the local ones for where you're going and learn the appropriate action if you run across them.

Small/Medium Critters:  These are your insects, birds, bats, raccoons, mice, etc.  I know this is a wide array, but they key here is that have some very common qualities.  These species are well known for carrying bacteria and diseases, get into your gear (especially food) if not stored properly.  There size allows them plenty of access and movement around a camp or along a trail.

Big Animals:  These are your bears, wild cats, wild canines, other large critters, to also include domesticated versions of these animals.  If you see an individual out on the trail with a pet on a lease, be sure to ask the owner's permission before petting, and approach cautiously and in a friendly manner (smile and open hand with palm up).  With the various types of species, look up how to handle them appropriately.  Example:  when you come across a bear, quietly back away, do not lay in the fetal position).

Store your food in a bear bag, attached to at least two different trees for best effect.  Also, when you cook or remove waste from your body, do so at least 100 ft from where you will be sleeping.

Pictured is a bobcat (I did not take the photo), and it reminds me of an excursion to Devil's Marbleyard.  Late at night I was lying in my hammock working on falling asleep when I noticed the sound of a third breathing object (my hiking buddy's, mine, and another).  I laying quietly, not moving.  Thinking about it, I remembered that we had heard the call of a bobcat earlier that evening.  The "area" and "tone" of the breath happened to sound similar and appropriate to that of the wild animal.  The animal sat there quietly, watching towards our camp area.  As defense, I crossed my arms and tucked my head in, this is a protective position as I did not want to make any major movements to disturb the animal, and I also wanted to protect my major organs.  The next main notation of an unwelcome animal was the sound of our bear bag being "played" with.  After some time, the sounds stopped and the extra breathing disappeared.  In the morning we found our bear bag had been knocked down slightly, there were no prints left behind as the ground was not soft enough to pick it up.

The key to animals is to not make yourself intimidating and to know what you may be getting yourself into.  Knowledge is power.

Venture On!

Sunday, March 17, 2013

Backpacking and Hiking Tip #7

-Plan Your Trip-

While I say this is a tip, there are a few things here that should really be mandatory.

1.  As stated before, select a hike based on the skill level of all those participating. Ex:  Do not be the parent that brings their young child on an expert level hike/trip, it will not be pretty.

2.  Select the appropriate gear for the trip.  Use the past tips to figure out what type of items you need/should bring

3.  Let others know about your trip.  In case of an emergency while on the trail, give a few people a map of where you're going, with your and any partner's contact info, estimated locations of where you will stay the night, and an estimation of when you should be back.  This allows emergency personnel to know when to begin searching for you and where in case something goes wrong.

Here's an article about a pilot who didn't fill out a flight travel log (he wasn't required to) and died in the wilderness, most likely due to not being able to be found in a timely manner:  http://www.nytimes.com/2008/10/03/us/03fossett.html?_r=0

4.  Check the weather before you go.  While you should be prepared for anything, checking the weather before you go lets you know which items should be at the top of your pack and easily accessible.

5.  Be safe, have fun.  A really easy, simple rule, people want you to come back, so be sure to come back.

There's more you can do, but these are the major things that my friends and I follow on our outings

Backpacking and Hiking Tips #6

-Gear:  Everything Else (Fire, First Aid, Survival, Extra)-

I promise, this will be my last post about gear, but it's gonna be a doozy.

First of all, there are several key items that backpackers, hikers, campers, and other outdoorsman like to call "essentials."  These are items that you should have on you, no matter the type of trip you go on, they are as follows (no particular order as they are all important):
-Water                 -First Aid Kit
-Food                  -Knife
-Fire Starter         -Flashlight

Fire:  In your bag you should carry several different types of fire starting materials.  I keep all of my fire starting gear in a small bag, which is actually flammable itself.  I have lighters (different colors for different environments), flint and steel, and matches (regular and water/wind proof).  Various types of tools allow you to be the best prepared for different environments and conditions.

My Fire Bag, with matches, flint and steel, and lighters
 First Aid:  No matter the trip you go on, you should have a good first aid kit.  In my gear I carry different sizes of band-aids and bandages, sticking bandages, bandannas for splints, CPR mask, anti-bacterial gear, aspirin, and a knowledge/reference book (good in case you come on something you're unfamiliar with or freak out, which happens)


To the right is some of the first aid gear that I carry.  Note:  I not only carry this gear, I also have different levels of First Aid Training, including:
-Boy Scout First Aid Training
-CPR/AED, Standard First Aid from Red Cross
-Wilderness First Aid from SOLO
Taking courses will help prepare you for the situations you might come across while in the outdoors.


Survival Extras:  These are items that I usually carry with me and have added benefit:
-Mirror, now why do I have a compact mirror in my bag, easy, because I can use it as a signaling mirror and it's compact
-Flashlihgt, multi-tool, and screw driver set, you need to have tools, and no matter how good your night vision, you don't know when it will be especially dark
-Compasses and maps, I carry two types of compasses (one also has a small glow-in-the-dark feature) since I can lend one to someone who has varying skill than myself, I have a backup, and I find one is better for mapping and one better for land navigation.  When you travel to an area you do not know, I highly suggest you pick up a map of the area and keep it in a sheet protector, it can come in handy.
Scissors and markers, these are actually a mix of first aid and multi-purpose gear.  Scissors make certain things easy to cut that knives will dull on, and markers are good for marking things (did you know, that if you put a tourniquet on someone you should put the time, in 24-hr time, on their forehead, as it lets emergency personnel know if it's safe to take it off or not)
Floss and Duct Tape, are two great items, they are great because they are strong and have multiple purposes, first aid, shelter building, repairs, and much more.

Other Gear:  In my bag I keep several other items that have important uses.  An entrenchment tool for digging holes, toilet paper (if you don't know what this is for, then I wonder your age).
Fishing line and fishing kit (note:  I keep a small, simple kit, not displayed, of lures, hooks, bobbers, weights, and sometimes other equipment), the key here is to only carry this if you're going to have the chance to carry it, otherwise it's wasted room.
Rope, always carry rope, of varying colors, lengths, and strengths.
Hot hands, gloves, knitted cap, these are good items to have with you often, as the weather can change dramtically, especially if you are not expecting it.  Before going on a trip, look to see if the area has special micro-climates that can change your hike into an overnighter.
Survival Saw, it is small, simple to use, and may come in handy.
Extra large light. I use this to light-up a set-up camp, it defines our area, and makes it easier to work with a "sun" than handling a flashlight

Extra:  This is gear that I carry, and is useful, but needs will determine if/when you carry it.
-Replacement buckles for my bag
-ID Protector
-Weather-proof notepad and pen/pencil
-Reflector Belt
-Leave No Trace Reference Card
-Other reference guides/books based on the trip
-ID/Identifying information, extra money
-Cellphone, small HAM radio (I don't carry the radio, but some people might, if trained)


I know this has been a lot of information, but like you, I want to move on to a different topic than gear.  What type of gear do you carry on your outings?

Saturday, March 16, 2013

Backpacking and Hiking Tips #5

-Gear:  Food and Cooking-

Yes, before you say it, this is another post about gear.  Remember that there is a lot of gear that you may carry while on an outing.

Food:  As with everything, light and easy to make/use is key to backpacking/hiking food.  Do NOT use cans and heavy items.  If you go to any outdoor store such as Bass Pro and Dick's you can find pouch bags of food.  These are light-weight, already set for about 1-4 servings (based on brand and size), and are easy to make.  Remember, that when backpacking you want a balanced set of food, since you will be on the trail and burning more calories than when at home.  As for when just taking a day hike, pick simple food like trail mix (ones filled with nuts and dehydrated fruit provide the most nutrition and variety of daily needs.  Remember, if it doesn't fit in your bag or adds a lot of weight, avoid it, try to find an alternative.
While backpacking at Devil's Marbleyard, a friend and I made small Pizzas
We did use a cast-iron skillet to do this

Cooking Gear:  In the world there are millions of different types of gear that can be used for cooking, the key to backpacking (since you should really try to avoid cooking if you're just hiking) is light-weight and multi-purpose.  When comes to actually cooking, I use two different types of sources:  a light-weight gas stove, or an open fire.  They are both highly effective and have their pros and cons (stove is easy to get going and control the heat though it only works as long as you have fuel, open fire provides warmth, multi-purpose use, can do more on it, but may be difficult to work in weather and has to constantly monitored)

Left and Top is my current cook gear, Right is my skillet and mess kit (old gear) and center bottom is my light-weight stove

For cooking supplies, I have used two different sets of gear.  On the right above you see a cast-iron skillet and a mess kit, both of these items worked great, the mess-kit was light, and the skillet was heavy-duty.  To the top of the photo is my current cook set.  It is lightweight, provides gear for two people (including plates, and cups) and folds completely upon itself.  To the left you see a large spoon, spatula, and sporks. They are plastic, so they clean easily and are reusable (yeah environmentally friendly!), I eventually want to get collapsible large wear to take up even more space (but these were cheap at Walmart, and cheap with efficiency is good enough for me)

Tomorrow I will go through the rest of my gear, including my fire bag, emergency/survival gear, and other key items.

Venture On! 


Friday, March 15, 2013

Backpacking and Hiking #4

-Gear:  Sleeping-

On backpacking trips you will carry gear focused on sleeping.  The more you trips you go on the more you will adjust what you want to carry.

I'll give you 3 different types of living quarters:

1)  Temporary Shelters/Survival Shelters:  These are great skills to know and should be practiced before heading into he wilderness.  A great benefit to these is that they can be made naturally (environmentally friendly), and can be easily modified for the environment.  A drawback, they take time to build, if you are going to arrive at a site late, it might not be worthwhile to spend a lot of time hunting out building supplies and then building and finally getting to sleep

A windbreak shelter that a friend and I built

2)  Hammock Camping:  Hammocks are great items to carry and use.  There are two types of hammocks and both have benefits and drawbacks.  Wool/heavy material hammocks are nice because they add more cushion for you and help to keep the nightly chill out.  Nylon/light material hammocks are nice because they are light-weight and are easy to pack small.  Wool versions may be heavy and require more materials (rope) to set-up, and Nylon materials are thin and do not do so well for cold weather on their own.
My hammock on a cold weather camping trip
One more note, I have used both wool and nylon, I personally prefer the nylon, and I use a hammock made by "Eno."  Along with the hammock you can get great straps to put up your hammock as well as:  Rain Fly, Bug Net, Warm Pad, Gear Net, and more.

3)  Tents:  Tents are great if you are going backpacking with a partner and the weather is going to get cold and windy.  Tents are easy enough to divide up the gear/weight among the group to make it easier to carry (one take the poles and stakes another takes the tent and fly, etc).  Today there are also backpacking tents which are great for longer trips because they are made well and will better protect you from adverse weather conditions.  

Other Gear:  As you backpack you will find that you want to carry other items.  This may include a sleeping bag (go light and small, otherwise it becomes a hassle to carry), a blanket (often times a light weight blanket that you can wrap all the way around yourself does wonders, especially in a hammock), a pillow (this is personal preference, I don't use one, instead I use a jacket, or other piece of my gear to lift my head).

The key is to remember weight, and ability to carry.  Tomorrow I will talk about some of the other pieces of gear you will want to carry

Venture On!

Thursday, March 14, 2013

Backpacking and Hking #3

-Clothing/Shoes-

Just as much as having the right gear (tomorrow's topic), the clothes your wear also determine how much you are going to enjoy the trip.

First, think of WWW, or Wick, Weather, Wind.
Wick-This is the layer that should be closest to your body.  This layer will focus on wicking the sweat off of your body and keep you cool.
Weather-This is the next layer and should focus on temperature regulation.  Here is where you want to add thermals (which actually go under the wicking layer), long sleeve clothes, light-weight long sleeve shirts for warmer weather, hats, and bandannas.
Wind-This layer is your outermost layer and actually addresses both wind and rain.  This is commonly a windbreaker that is waterproof.  It should be light-weight, and also easy to access, as it will most likely be the first one you pull off and put on as the weather changes.

Take care of your feet.
You will need two things for your feet, otherwise, it doesn't matter if it's a mile hike or a five day backpacking trip; good socks and good shoes.
Socks-Wear thick wool socks, there are many types that are actually designed to wear better for trips (my suggestion:  the Venturing BSA socks).  If you want to help prevent the socks from sliding and causing blisters, wear a dress sock underneath the heavy sock.
Shoes-Having good shoes on your feet makes a big difference.  Number one, remember that no matter the type of shoe, you will have to break them in.  Take them on short trips, wear them around with your everyday clothes until they feel comfortable and the side walls are loose enough that they don't feel like they are cutting off circulation.  Then the debate:  sneakers vs boots.  My suggestion, sneakers for short, easy to moderate hikes, boots for long and increased difficulty.  I say this because sneakers are light-weight and easy to get used to; boots on the other hand add more support and will protect you better when you enter difficult terrain, but they are heavy.

**Note:  Steal-toe and Combat Boots:  these are both good types of shoes, however, I do suggest you wear them around and see how they feel, personally, I suggest regular hiking boots over combat boots**   

Some of my personal gear:  Windbreaker, long-sleeve shirt, wicking t-shirt, ankle-length Venturing BSA Socks, calf-length Boot Socks (from a military commissary), and my hiking boots, and a hat


Wednesday, March 13, 2013

Backpacking and Hiking #2

-Pick the right trail-

This sounds like common sense, but common sense is not so common.

If you are a novice, new start, etc, it is a good idea to start with small hikes and build up.  See if you can do a 5 mile hike with ease and in a decent amount of time.  5 miles is a good length to get started on as it let's you know how your endurance is.  Also, select hikes that are considered "Easy" or "Moderate".  These are usually hikes with little elevation change, or very gradual.

If you are interested in backpacking, take a few hikes with your gear on your back.  Remember, carrying the gear you need for an over-nighter is a lot more than a day bag, work on getting used to the weight change before hitting the longer trails.

As you do more, you will learn what your body can physically and mentally handle, as well as know how you want to challenge yourself.  Work yourself up to "Intermediate" "Expert" and "Challenging" leveled trails.

A basic skill that is very useful is to pull out a topographic map and look at the change in elevation, see where the trail goes, that way you can justify if you can handle areas that might actually have near vertical components.  There are many trail sites that provide these.

Remember, distance and elevation change are key skill marks for selecting a hike

 An topographic map showing the trail for Devil's Marbleyard
Note:  A friend and I did this Sept 2012 and it was a great hike, with a nice steep portion near the beginning that was roughly 1000ft elevation change in .25 mile

Tuesday, March 12, 2013

Backpacking/Hiking Tip #1

While Backpacking and Hiking are both very unique, they have a lot of similar traits and skills which is why I have combined the two of them.  (Note:  Backpacking is a hiking trip taken over more than one day where you actually camp at a different location each night)

Select a Backpack

When you're going to head out and hit the trail, keep in mind that you will need an appropriate bag for the type trip you're going on.

Day Bag-For short hikes (both in duration and distance) carry a simple bag that can carry water, trail food, and simple emergency/survival supplies.  Draw string bags are good examples of these

Dufflebags/Stuffbags-Yeah, don't use these for either, they are big, bulky, not good for any trip

Internal Frame Backpacks-These bags have an internal frame that provide strong support, making it good for backpacking.  The internal frame is beneficial because if you are in the woods, it will prevent branches, and other obstacles from latching onto your bag.

External Frame Backpacks-These bags have an external frame that provide strong support, making it good for backpacking.  The external frame is beneficial because it allows you to attach extra equipment to the outside portion of the bag, keeping the main pockets free of "extra" gear.  This type of bag is works well in open fields, and clearer areas.

Remember, frames for backpacking, simple bags for hiking.

Also, before you purchase a bag, be sure to make sure it fits you (some bags are adjustable for height).  It would be a terrible thing to be on the trail and your bag sways so much since it's so large and you can't stabilize it.

What questions do you have about selecting a bag?

Above is an image of my internal frame pack

Sunday, March 10, 2013

Bullying and Hazing: Support

If you find yourself, someone you know, or anyone being the victim to bullying or hazing, there are several actions you can take.

1) Report:  if you see an occuance, report it (even if you talk to the victim and they say they will, they might not).  There are several places to go to report an offense.  You can report it to a trusted figure (Boss, Teacher, Religious Official, Scout Leader, etc), this may also include the Police/emergency personnel, especially if the situation is violent.  Be aware of institution specific regulations that might have specific rules to ensure proper reporting.

2) Speak to the Victim:  Always take time to talk to the victim to learn more about the situation and reasure the victim if they have to take the step of reporting.  **it may be especially difficult for someone to turn in someone they consider a friend, role model, etc**

2a) Speak to the Perpetrator:  This is a tricky situation, as such, you should tread lightly.  To protect the victim, you usually do not want to speak to the perpetrator as this may open up for the possibility of an even more serious situation.  However, if a Victim's story appears exceptionally strange, then you may want to talk to the suppossed perpetrator, to avoid a false case or reverse-bullying/hazing.

3) Follow Up:  Be respectful to those involved, though you may want to still follow up with the victim to ensure they have been well taken care of.  Most likely, the victim will have been given resources to handle the pressure, you may want to provide others.  (Bullying.org, "I need a lighthouse" (local to Virginia Beach, VA), and others)

Remember, the most important thing for you to do is to ensure proper action is taken and handled appropriately by the appropriate personnel.

I know this has not been 10 facts, but for now I see this as enough, you can always leave a comment and I wil direct you to the appropriate resource.

Tomorrow I start 10 Backpacking/Hiking Tips

Friday, March 8, 2013

Bullying and Hazing #4: Golden Rule

As a person of character, it should be your goal to treat all of your fellow man equally.  You may have different views from someone else, everyone should still respect the views of others. Unless an act is malicious or harmful, or is considered bullying or hazing, then respect the views of others (Golden Rule: Treat others as you want to be treated)

If you do see an action that appears to be against rules, norms, and regulations, it is up to you to act.  There are multiple cases each year of situations not being reported, either due to ignorance, "someone else will handle it", not wanting to become involved, and other various reasons. 

No matter the case, report an incident to the appropriate personnel so that it is handled appropriately and efficiently.  Tomorrow I will share a list of resources, locations to report or question appropriately (when I have a better internet connection)

Thursday, March 7, 2013

Bullying and Hazing #3

While bullying and hazing exist, it is also important to understand where the line is, because there do exist exceptions and actions that might not fall under either category.

-Military Training:  With ROTC programs and related military training programs, there is a certain level of physical, mental, and emotional stress that is required to be placed on an individual.  Usually, these lines are created by their departments, commanders, a higher authority.  Programs that might cross these lines are usually approved via an Operation Order (OpOrder)

Example of "approved" action:  Watch the Movie "A Few Good Men" which was based on real events


-Initiations:  Many groups hold special initiation rights of passages to accept new members.  Typically, pledges/taps/etc are given tasks/goals to complete in order to join.  These societies are governed by special boards (larger ones are governed by a National Board/Committee), that dictates what these initiates can go through.

http://www.cornellsun.com/section/news/content/2013/03/04/three-cornell-fraternities-suspended-due-hazing-allegations

Be aware, even if you do not believe you are being bullied or hazed, if it breaks the specified codes and does not meet society criteria of what is authorized, it is still bullying or hazing.  Be sure you are being active to put down these type of activities, especially aware of it at a High School or lower level where participants may only due to it because it seems "fun" and is a "right of passage" or "it's been done before, why not"

Remember, comments are more than welcome, discussion is important.

Bullying and Hazing #2: Consequences

Bullying and Hazing can have a profound impact not only on the one being bullied/hazed, but also on the one doing the action.

Consequences on the Bullier/Hazer (all of these are possibilities, and vary based on the level, location, and laws, they may result in more severe charges as well):

-Suspended/Probation
-Fines/Community Service
-If in Reserve Officer Training Corps (ROTC), cadets may lose their commission
-Jail time
-and more

Consequences of being Bullied/Hazed (these are all possible, they may or may not happen):

-Negative physical, emotional, social impacts
-Decreased success (academically/competitively)
-Retaliation (becomes a bully, responds with physical force, school shootings)
-Self-harm/Suicide


Remember, no matter who an individual is, what condition they may or may not be in, do not bully or haze, it has negative effects for both the one committing the act and the acted upon.

More info can be found here:  http://www.stopbullying.gov/at-risk/effects/index.html

Wednesday, March 6, 2013

Special Topic: Bullying and Hazing Facts

For this set of 10 I want to provide facts about bullying and hazing.  I will do my best to provide evidence and supporting information, rather than just experiences, to show the dangers and importance of recognizing this action.

I do encourage comments and discussion
**Disclaimer:  Any vulgar, malicious, off topic, or related activities will not be authorized on this board, comments will be removed**

Bullying and Hazing Fact #1:  Know what they are

Knowing what these are is the first step to preventing them.

Bullying:  Bullying is unwanted, aggressive behavior among school aged children that involves a real or perceived power imbalance. The behavior is repeated, or has the potential to be repeated, over time. Bullying includes actions such as making threats, spreading rumors, attacking someone physically or verbally, and excluding someone from a group on purpose. -stopbullying.gov

Hazing:  It shall be unlawful to haze, or otherwise mistreat so as to cause bodily injury, any student at any school, college, or university.
Any person found guilty thereof shall be guilty of a Class 1 misdemeanor, unless the injury would be such as to constitute a felony, and in that event the punishment shall be inflicted as is otherwise provided by law for the punishment of such felony.
Any person receiving bodily injury by hazing or mistreatment shall have a right to sue, civilly, the person or persons guilty thereof, whether adults or infants.
The president, or other presiding official of any school, college or university, receiving appropriations from the state treasury shall, upon satisfactory proof of the guilt of any student found guilty of hazing or mistreating another student so as to cause bodily injury, expel such student so found guilty, and shall make report thereof to the attorney for the Commonwealth of the county or city in which such school, college or university is, who shall present the same to the grand jury of such city or county convened next after such report is made to him. -Virginia Statue on Hazing

In later posts I will address the line between positive behavior and bullying/hazing, the consequences for both the one doing the actions and the one being acted upon, and other related topics.

Welcome, and the First 10

Ever want a quick set of tips on a subject, anything that might be of interest.  In this blog I will lay out a series of 10 Tips per topic, the subjects will vary as to eventually provide something for everyone.

As a quick start, here is the First 10 on Writing (in the future, they will be released as one, maybe two a day)

Writer's Tip #1: Get to know your characters. In fiction, just like non-fiction, you want to learn as much as you can about the characters you are creating. Learn to "live," think, imagine as your characters would.


Once you understand the drives, the thoughts, the emotions of your characters, then you know you can create a story your readers will become connected to.


Writer's Tip #2: Know the lay of the land. In non-fiction you wouldn't put Gettysburg, PA south of Petersburg, VA, with that in mind, don't do that in fiction either. It is important to keep your "world" geographically correct, if you must, and my suggestion, create a map to use for reference.


Writing Tip #3: First v. Third Person. The best answer, you just have to "feel" when it is right to use which one. For the "understandable" answer...

...Think of it like this, first person is the characters inner thoughts, what they are saying directly, think of it like you narrating your life, while you might not have the cool voice, you know all of the details and can give understanding to reason. In third person, it's the outsider looking in, how other people perceive your character, what is going on from a wider view, think of it as you have James Earl Jones narrating your life and also if your friends were describing what you were/are doing.


Writing Tip #4: Writing Style. As you write, create your own style, yes, you must still follow grammar rules and spell correctly, but you might find something that creates a unique vision.

For example, in some of my writings I write like I'm presenting a speech, I add commas/breaks as a way to add emphasis, or force pauses where is ups the intensity, etc. Find what adds your special edge, and it might not be the same for every piece of writing either


Writing Tip #5: Know your Audience. This may sound cliche, but it's true. If you'r writing an academic paper, write like a professional, if you're writing a story for little kids, use appropriate language and wording. Once you define your audience, then you can determine what aspects of your writing you need to focus on more or less


Writing Tip #6: Dramatic imagery vs minimal imagery

I've written with both before, and I enjoy both for different reasons. Using a lot of imagery draws in your audience, it makes it so they see every detail with ease, very common in books that the reader gets absorbed into. With minimal imagery, it leaves room for the reader to create some of the story, it works their mind so they become attached to the stay because they "created" parts of the story.

Both are good, use which ever you feel is best for your audience


Writing Tip #7: Edit, edit, EDIT!

This should go without saying, but be sure to edit your work, then have someone else edit it, then have another, and maybe even another person edit it. The more editors you have, the greater chance you have of catching your mistakes that you just glaze over because it's natural for you.

This is when you like your "Grammar Nazi" friend. Plus you two could exchange works and help each other


Writing Tip #8: Plot Holes

They happen, and depending on the subject, depends on if you need to close them. If you are writing an academic paper, then you want to cover any weaknesses in your argument, remember, you want to make a sound proof argument. As for fiction, they may happen. Readers who just read to read, won't care if it is a small mistake, on the other hand, dedicated readers and major holes that are never brought back up, may leave your readers questioning their allegiance


Writing Tip #9: Number of Characters

This is a tricky point since it handles based on your writing style. For the most part, try to keep main characters to only a key few. These are characters which actively drive the plot and have key roles, to include the protagonist(s) and antagonist(s).

Supplementary characters, you have a large number of. Still keep an easy handle on secondary ones, as your readers should still be somewhat attached to them. As for tertiary, go for as many as you want, they are there as filler, shot plot movers, and tend not to last for more than a chapter or two.


Writing Tip #10: Share your work

Once you have worked on your piece for however long, share it. Try to publish it as a novel (either self or via publisher), in a literary magazine, in a competition, get it out. You never know where you'll get followers.